How to Scan and Prepare a Signature for Exam Forms (Full Guide)
A complete candidate masterclass on capturing, scanning, and preparing handwritten signatures and left thumb impressions (LTI) for competitive recruitment exams. Master pen selection, flatbed scanner DPI settings, mobile anti-glare techniques, and background cleanup.
In high-stakes competitive examinations across South Asia—including UPSC Civil Services, Staff Selection Commission (SSC CGL / CHSL), Institute of Banking Personnel Selection (IBPS), National Testing Agency (NEET / JEE), and Pakistan's Federal Public Service Commission (FPSC CSS)—your signature is not merely an artistic formality. It is a legal biometric identifier that binds your registration profile to your physical presence in the examination hall.
On exam day, when you sign the physical attendance sheet and the computer-based test verification roll, your live signature is compared against the digital graphic printed on your Admit Card. If you submitted a faint, blurred, or distorted signature that was poorly scanned from a yellowed piece of notebook paper, the center invigilator can withhold your attendance or flag your seat for suspected impersonation.
Preparing a flawless digital signature requires understanding the physical properties of pen ink, paper absorption, optical resolution, and automated contrast thresholding. In this comprehensive guide, we examine the physics of digital signature capture, explain how to scan both signatures and Left Thumb Impressions (LTI), and show you how to generate verified files using Pagla Tool's free client-side suite.
The Science of Pen Inks: Gel vs Ballpoint vs Fountain Pens
Before touching a scanner or camera, your choice of writing instrument determines whether your digital signature will look sharp or faint:
- Gel Pens (Recommended / 0.7mm Tip): Gel ink uses water-based gel suspension containing densely packed pigment particles. Unlike liquid ink, it does not feather into cheap paper fibers; and unlike ballpoint paste, it flows continuously without skipping. When scanned, gel ink produces high optical density with sharp, clean outer edges that survive JPEG quantization effortlessly.
- Ballpoint Pens (High Risk of Rejection): Ballpoint pens utilize thick, oil-based paste ink. As the metal ball rolls across the paper, microscopic imperfections create skips, streaks, and uneven pressure gradations. When a ballpoint signature is converted to a high-contrast digital file, the lighter strokes vanish entirely, leaving a broken, dotted signature that fails validation.
- Fountain Pens & Liquid Rollerballs (Paper Bleed Warning): Fountain pens use low-viscosity liquid dye. On ordinary copy paper, liquid ink bleeds laterally into the wood fibers (capillary feathering), swelling thin loops into solid black blots. If you use a fountain pen, you must sign on heavy 100 GSM coated paper.
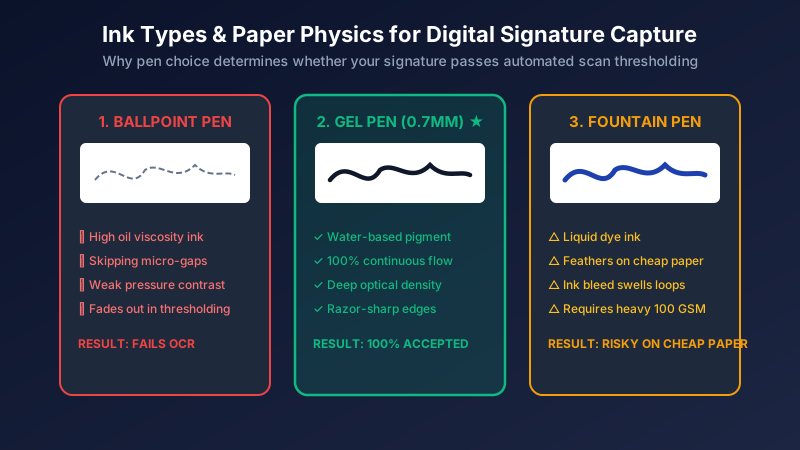
Figure 1: Optical density and stroke continuity comparison across pen types under digital magnification.
Paper Weight & Ruling: Why Lined Paper Triggers Disqualification
One of the most frequent rejection causes logged by Staff Selection Commission and State Public Service scrutiny officers is "Signature on Ruled Paper".
When you sign on lined notebook paper, the pre-printed horizontal blue or grey ruling lines intersect your handwriting. When the file is processed through contrast thresholding software:
- The software attempts to preserve the dark notebook lines alongside your signature, creating horizontal bars across your name.
- If the software attempts to filter out the blue lines, it erases portions of your letters where the ink crosses the ruled line.
- Automated OCR software flags the intersected text as an unreadable composite graphic.
Always sign on unruled, pure white 80 GSM bond or copier paper. Draw a faint bounding box in 2B pencil measuring 7 cm × 3 cm, sign smoothly inside the boundary, and ensure your handwriting loops stay 5 mm away from the pencil borders.
Flatbed Scanner Configuration: DPI, Descreening & Color Modes
If you have access to a desktop flatbed scanner (Canon CanoScan, HP DeskJet, Epson Perfection), configure these exact driver settings:
- Resolution: Set to 200 DPI or 300 DPI. Never scan at 72 DPI (too blurry) and avoid scanning at 1200 DPI (creates massive 50MB files that choke browsers).
- Color Mode: Scan in 24-bit TrueColor (RGB) or 8-bit Grayscale. Avoid 1-bit Black & White (Monochrome threshold) mode at the scanner level, as raw scanner thresholding introduces jagged staircase pixelation.
- Descreening: Turn "Descreen" OFF. Descreening is designed for printed magazines and will soften sharp handwritten ink edges.
- Glass Cleanliness: Clean the scanner glass with an antistatic microfiber cloth. Fingerprints and dust specks on the scanner platen will appear as black dots on your signature file.
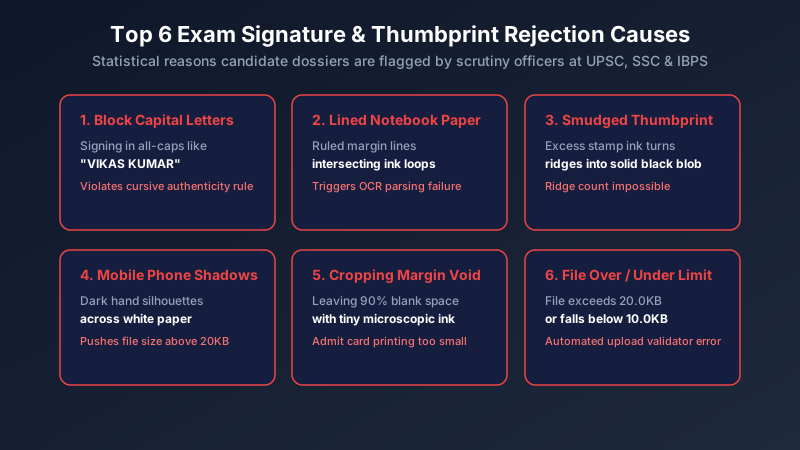
Figure 2: Statistical breakdown of common candidate errors leading to application disqualification.
Scanning on a Smartphone: How to Get Flatbed Quality with Zero Glare
If you do not own a flatbed scanner, you can produce identical optical results using your smartphone by following these photography techniques:
- Daylight Side-Illumination: Place the signed paper on a flat table next to an open window. Daylight coming across the paper at a 45-degree angle illuminates the ink without producing specular glare reflections.
- Never Use Camera Flash: Smartphone LED flashes create a bright circular hotspot directly in the center of the paper, washing out the ink and causing severe shadow gradients around the perimeter.
- Step Back & Zoom 2x: Do not hover your phone 4 inches above the paper, as your hand and the phone body will cast a dark shadow across the signature. Instead, hold the phone 18 to 24 inches away and use 2x optical zoom. This keeps your shadow completely off the paper while eliminating perspective keystoning.
Special Guide: Preparing Left Thumb Impressions (LTI) for Banking Forms
Banking examinations (IBPS PO, SBI Clerk, RBI Assistant) and Railway Recruitment Boards mandate the upload of a clear Left Thumb Impression (LTI) alongside the signature.
Thumbprints fail scrutiny for one primary reason: Over-inking. When candidates press their thumb heavily into a wet stamp pad, excess ink fills the microscopic papillary valleys of the skin. When pressed onto paper, the result is a solid, amorphous black smudge with zero visible ridge patterns.
To prepare a forensic-grade thumb impression:
- Use Blue or Black Stamp Ink: Ensure the stamp pad is moist but not saturated.
- The "Dab & Test" Technique: Lightly touch your left thumb to the pad once. Press your thumb twice onto a scrap sheet of paper to bleed off excess surface ink before applying it to your official submission sheet.
- Gentle Rolling Contact: Place your thumb on the paper from left to right in one smooth, light rolling motion without sliding or twisting. The resulting print should show clear, individual dermal friction ridges (whorls, loops, or arches).
- Dimensions & File Size: Resize the thumbprint to standard dimensions (typically 140 × 60 px or 200 × 200 px, 10KB to 20KB) using Pagla Tool's Signature Resizer.
Step-by-Step: The Complete Signature Preparation Workflow
Here is the complete end-to-end workflow to prepare your exam signature in under two minutes:
Step 1: Sign in Dark Gel Ink
On a clean sheet of unruled white paper, sign your natural cursive signature inside a pencil box using a 0.7mm black gel pen. (Ensure it is NOT in block capital letters!).
Step 2: Capture or Scan
Scan the paper at 300 DPI, or take a well-lit phone photo from 2 feet away with 2x zoom in bright daylight.
Step 3: Crop Tight to the Handwriting
Crop away all excess blank paper margins, leaving roughly 3 mm to 5 mm of white space around the outermost loops of the signature.
Step 4: Clean and Resize with Pagla Tool
Open the Signature Resizer Tool. Select your exam preset (e.g. 140 × 60 px for IBPS or 200 × 80 px for SSC). Toggle "White Background Cleanup" to instantly convert paper grain and shadows to pure hex #FFFFFF.
Step 5: Download Verified File (10KB to 20KB)
Set your target file size to 15 KB. Click "Download Resized Signature". Your file is saved directly to your device storage, 100% compliant and ready for immediate portal submission.
Clean and resize your exam signature right now
Remove paper shadows, whiten the background to 100% pure white, enhance ink contrast, and hit the exact 140×60 px and 10-20KB limit in seconds.
Open Signature Resizer ToolAdmit Card Discrepancies: What Invigilators Check on Exam Day
When you enter the physical exam venue, the invigilation team verifies three aspects of your uploaded signature:
- Print Resolution on the Admit Card: If your uploaded signature was low resolution or heavily blurred, the admit card printer produces a dark block of pixel dots. Invigilators cannot verify your signature against your photo ID and will pull you aside for manual biometric logging.
- Cursive Stroke Characteristics: Invigilators inspect character slant, letter connections, and initial capital flourishes. If your uploaded signature was signed in block capital letters, it does not match cursive handwriting, raising an instant red flag.
- Matching Attendance Sheet Signature: You must sign the physical attendance sheet in the exact same style, speed, and casing as the signature printed on your admit card.
Frequently Asked Questions (FAQ)
Can I scan my signature using my smartphone without an office scanner?
Why are signatures signed in capital letters rejected by IBPS and SSC?
What scanner resolution (DPI) should I use for exam signatures?
How do I prevent my Left Thumb Impression from turning into a black blob?
Is my signature secure when using Pagla Tool?
Summary & Helpful Resources
Preparing a flawless exam signature requires simple physical discipline: dark gel pen, unruled paper, no block capitals, and proper lighting. By combining clean paper capture with Pagla Tool's client-side background whitening and 140×60 pixel resizing, your exam submissions will clear automated screening and admit card verification every time.
Explore our other document preparation resources: