How to Make a Passport Size Photo at Home for Free (Smartphone Guide)
Stop paying expensive photo studio fees. Discover how to create studio-grade, ICAO-compliant passport photos at home using your existing smartphone, natural window daylight, and free client-side browser tools.

Visiting a commercial photo studio to get passport photos is often an inconvenient and surprisingly expensive chore. High-street photography shops routinely charge anywhere between ₹150 and ₹350 in India, or Rs. 500 to Rs. 1,000 in Pakistan, for a tiny packet of four small prints. Worse, commercial photographers frequently rush the session, snap a single shot under blinding flashbulbs, and apply aggressive skin-smoothing filters that can actually violate biometric standards.
The reality of modern digital imaging is that the camera sensor already resting in your smartphone pocket is vastly superior to the aging point-and-shoot cameras used by many corner photo booths. Modern smartphones feature multi-megapixel sensors, sophisticated optical lens elements, and real-time computational photography engines capable of producing studio-quality portraits.
With just a few basic lighting techniques and a free browser-based formatting tool, you can capture a flawless passport photo in your living room, align it to official millimeter tolerances, replace the background with compliant solid white, and compile an 8-photo print sheet for pennies. In this step-by-step masterclass, we teach you the professional lighting setup, reveal the camera settings that prevent optical barrel distortion, and guide you through producing print-ready sheets at home.
The Zero-Cost Home Studio Equipment Checklist
You do not need an expensive DSLR camera, softboxes, or umbrella strobes. You already have everything required inside your home:
- A Smartphone with a Clean Lens: Any modern smartphone released in the last 6 years (iPhone, Samsung Galaxy, Xiaomi, OnePlus, Vivo, Realme) with an 8MP or 12MP+ camera.
- A Large Window with Diffused Daylight: An east- or north-facing window that lets in soft natural daylight without direct burning sunbeams.
- A Plain White or Light Wall: A smooth painted wall, the back of a flat white door, or a plain white bedsheet hung wrinkle-free.
- A Helper or Phone Stand: A family member, roommate, or a simple tripod/shelf to hold the phone steadily at eye level.
- A White Cardboard or Foam Sheet (Optional Reflector): A standard piece of white chart paper or kitchen foam board to reflect gentle fill light into cheek shadows.
The Physics of Mobile Sensor Crop Factors
To understand why smartphone cameras can outperform commercial photo booth hardware, consider modern sensor architecture. A 1/1.3-inch or 1/1.7-inch mobile camera sensor paired with an f/1.8 optical aperture gathers substantial light in ordinary room daylight.
However, because mobile camera lenses feature short actual focal lengths (around 5.5mm to 6.8mm physical glass), the depth of field is naturally wide. This is an immense advantage for passport photography: both the tip of your nose and the lobes of your ears remain in tack-sharp focus simultaneously!
In contrast, amateur photographers using DSLRs with wide apertures (like f/1.4 or f/1.8) often suffer from shallow depth of field where the eyelashes are in focus but the ears are blurred—a defect that violates ICAO Doc 9303 sharp edge requirements. Smartphones naturally keep your entire head within the critical circle of confusion.
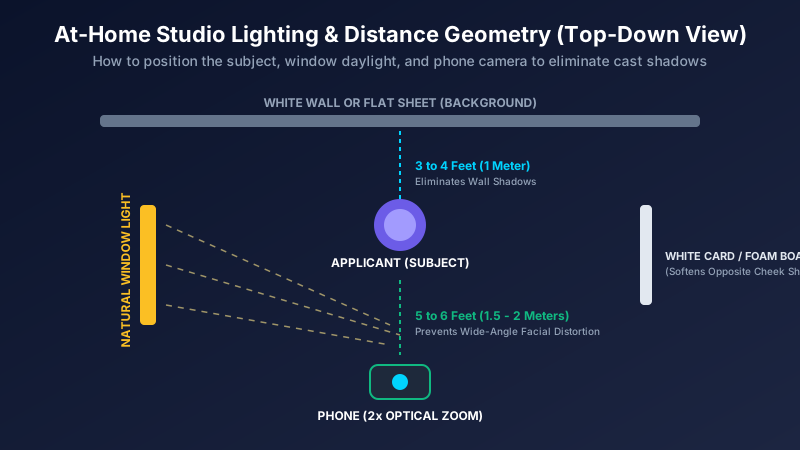
Figure 1: Overhead geometrical positioning of window daylight, subject, and smartphone camera.
Lighting Geometry: Harnessing Natural Daylight Without Flash
Why do photos taken with phone flashes look so terrible? Built-in smartphone LED flashes are tiny point-light sources positioned just 5 millimeters away from the lens. Firing a tiny LED flash directly into a human face creates harsh oily skin reflections, casts deep shadows under the nose and chin, and projects a dark silhouette onto the wall behind your head.
To achieve the look of an expensive 500-watt diffused softbox:
- Use Window Soft Light: Position yourself facing an open window during morning or late afternoon hours. Large window panes act as massive natural light diffusers, producing silky, even illumination across both eyes and eliminating facial shadows.
- Stand 3 to 4 Feet Away from the Wall: Never lean your back directly against the wall! Standing 1 meter (3 to 4 feet) forward allows light to wrap around your head, ensuring zero cast shadows fall onto the backdrop.
- Use a Fill Reflector: If the window illuminates one cheek more than the other, have your helper hold a white piece of chart paper or a white towel on the darker side of your face. This bounces gentle light back into the shadowed cheek, producing perfectly balanced dual lighting.
Camera Setup & The 2x Zoom Secret: Avoiding Nose Distortion
The single greatest mistake people make when taking DIY passport photos is using the front-facing "selfie" camera held at arm's length.
Smartphones use ultra-wide focal length lenses (typically 24mm to 26mm equivalent) on their selfie and main cameras to fit landscapes and group selfies into the frame. When you hold a wide-angle lens 18 to 24 inches from your face, optical barrel distortion occurs:
- Your nose and chin are projected closer to the lens, appearing 20% to 30% larger than they actually are.
- Your cheeks and ears curve away toward the edges of the frame, often disappearing from view entirely.
- The facial width-to-height ratio is severely warped, violating biometric Euclidean geometry!
The Solution: The 2x Optical Zoom Trick: Always use the rear camera. Have your photographer stand back approximately 5 to 6 feet (1.5 to 2 meters) and switch the camera to 2x optical telephoto zoom (or 50mm portrait equivalent). Standing further away and zooming in optically compresses perspective, rendering your nose, cheeks, and ears in true anatomical proportions.

Figure 2: Multi-photo composite sheet layouts for 4×6 inch and A4 paper with cutting guides.
Dye-Based vs Pigment-Based Inks for Archival Quality
If you plan to print your at-home passport photos on an inkjet printer, understanding the chemical difference between dye and pigment inks ensures your prints do not smudge or fade:
- Dye-Based Inks (Common Consumer Inkjets): Found in standard desktop printers (such as Epson L-series EcoTank or Canon G-series). Dye inks dissolve completely in liquid, soaking deep into glossy photo paper fibers. They yield vibrant, punchy colors and smooth skin tone gradations. However, they are sensitive to moisture and must be allowed to dry for 10 minutes before handling.
- Pigment-Based Inks (Professional Photo Printers): Pigment inks use microscopic encapsulated mineral particles suspended in liquid. Once deposited on semi-matte or lustre paper, they become 100% waterproof and archival-grade, resisting UV light for over 50 years. Consular posts accept both, provided the prints are completely dry and free of ink bleeding.
Posture, Facial Expression, and Eye-Contact Guidelines
Before tapping the shutter button, review these four biometric posture rules:
- Direct Eye Contact: Look straight into the camera lens, not at the phone's screen. Both pupils must be centered in the eye sockets.
- Square Shoulders: Sit upright on a backless stool or stand with both shoulders level and relaxed. Do not tilt your head even slightly.
- Neutral Expression: Keep your mouth closed and facial muscles relaxed. A smile that reveals teeth or changes the lip contour will be flagged by automated immigration scanners.
- Hair and Ears: Tuck stray hair behind your ears. Your forehead, eyebrows, and the outer contours of both cheeks must remain fully visible.
Step-by-Step: Formatting Your Photo with Pagla Tool
Once you have captured a sharp, well-lit portrait, formatting it to official specifications takes less than 60 seconds with Pagla Tool:
Step 1: Open the Passport Size Photo Maker
Navigate to our Passport Size Photo Maker on your phone or computer. The tool runs 100% locally in your browser with zero file uploads.
Step 2: Select Your Target Country Preset
Choose your desired document preset:
- 3.5 × 4.5 cm (35 × 45 mm): For India, Pakistan, UK, Schengen, Australia, and European portals.
- 2 × 2 inch (51 × 51 mm): For US Visas (DS-160), DV Lottery, and Indian OCI cards.
- Custom Size: Enter exact millimeter or pixel dimensions if your specific portal enforces unique criteria.
Step 3: Align Head within the Visual Biometric Guides
Drag the canvas and adjust the zoom slider so your head aligns with the built-in reference guides. Ensure your chin rests on the lower marker and the crown of your hair touches the top boundary, guaranteeing the mandatory 70% to 80% facial coverage.
Step 4: Enable Pure White Background Fill
Toggle the "Pure White Background Fill" option. This instantly cleans up uneven wall paint, shadows, and subtle yellow color casts, replacing them with a crisp, solid hex #FFFFFF backdrop.
Step 5: Download Single Photo or Composite Print Sheet
If submitting online, download your single high-resolution 300 DPI JPEG. If you need physical prints, click "Download 4×6 Print Sheet (8 Photos)" to receive a perfectly spaced printable template.
Make your passport photo right now for free
No subscriptions, no software downloads, no watermarks, and 100% private in-browser processing. Generate single photos or printable sheets in seconds.
Open Passport Size Photo MakerPrinting Economics: How to Print 8 Photos for Under ₹10 / Rs. 30
Here is the secret commercial photo studios do not want you to know:
When you walk into a photo studio and ask for "passport photos", they charge you ₹150 to ₹300 ($2 to $4) because they treat it as an executive service. However, if you bring a standard 4×6 inch digital photo file on a USB flash drive or send it to their WhatsApp and say, "Please print this 4×6 photo print", they treat it as an ordinary family snapshot and charge their standard postcard print rate:
- India: A 4×6 inch glossy print costs between ₹8 and ₹15 at any local photo lab or studio kiosk. That gives you 8 passport photos for less than ₹2 each!
- Pakistan: A 4×6 inch glossy print costs between Rs. 25 and Rs. 40, yielding 8 photos for under Rs. 5 each.
- United States: A 4×6 print at Walgreens, CVS, or Walmart costs approximately $0.35 to $0.45, compared to the $16.99 they charge if you use their in-store passport photo service!
Printer Paper Type: If printing on your home inkjet printer (Epson, Canon, HP), use 200 to 255 GSM premium glossy photo paper. In your print settings, ensure the scaling is set to 100% / Actual Size to preserve the exact 35×45 mm dimensions.
Trimming & Cutting: Achieving Professional Razor Edges
Cutting your photos with dull kitchen scissors often leaves jagged, curved borders that look unprofessional. To achieve clean, studio-grade edges:
- Place the printed 4×6 sheet on a flat cutting mat or thick cardboard sheet.
- Align a stainless-steel metal ruler along the thin printed cutting guide lines.
- Hold the ruler firmly with your fingers and pull a fresh, sharp craft utility knife (X-Acto or utility blade) lightly along the metal edge. A single smooth pass produces crisp, perfectly straight borders.
Top 5 Mistakes People Make When Taking Photos at Home
Avoid these common DIY errors to ensure your at-home photos pass consular scrutiny on the first attempt:
- Warm Tungsten Indoor Lighting: Taking photos under yellowish 2700K incandescent bedroom bulbs casts an unnatural orange/yellow tone across the face and wall. Always shoot in pure natural daylight.
- Shadows Under the Chin: Overhead ceiling lights positioned directly above your head create dark raccoon shadows in your eye sockets and under your chin. Face your light source directly.
- Selfie Arm Angle: Holding the phone yourself inevitably twists one shoulder forward, creating an asymmetrical posture. Always have a second person take the photo or use a 3-second self-timer on a stand.
- Wrong Scaling During Printing: Selecting "Fit to Page" in the print dialog box stretches or shrinks the layout, turning 35×45 mm prints into 32×41 mm prints that get rejected at the counter.
- Wearing White Shirts: Wearing white clothing on a white background causes shoulders to blend into the wall. Always wear a dark, contrasting shirt or jacket.
Frequently Asked Questions (FAQ)
Are passport photos taken at home legally accepted by authorities?
Can I use my smartphone's selfie camera?
What paper should I use to print passport photos at home?
How do I print 8 photos on a single 4x6 print sheet?
Is my photograph stored on your servers when I use Pagla Tool?
Summary & Related Tools
Making an official passport photo at home is fast, simple, and saves you money. By using soft daylight from an open window, standing 3 feet in front of a white wall, taking the shot with 2x optical zoom, and formatting the image using Pagla Tool, you can produce professional 300 DPI passport photos anytime you need them.
Explore our other document preparation resources: